
Pelargonium Fruit Beer
- May 13, 2020
- 8 min read
It seems that the lockdown has awoken the inner fermenter in many people. All of a sudden, we seem to be bombarded on social media by humble/braggy posts of recent successful fermenting experiments. Whether it is beautiful sourdough breads, sauerkraut/kimchi or pineapple beer, everyone seems to have the capacity and time and interest now to develop their skills at fermenting. The motivations to ferment seem to be endless, but at the base of these endeavours is the overarching theme that I will be taking away from the lockdown:
When time is no longer a limiting factor in our lives, the way our brains function seem to change. Even though many of us are still working (from home) and still have technically loads of work to do, it is undoubtedly true that there is a large portion of our brains that has been freed up. We are in some ways regressing to an era where you had to be self-sufficient: even though you can still go buy a sourdough from a baker, people are choosing to try make it themselves. Perhaps we have realised outsourcing everything to someone else is not always a reliable option. I have always argued that the blind trust we put in society to outsource skills is a risky way to live. Developing self-sufficient skills like fermenting seems to have given people solace during this time: a feeling of comfort that you can do something productive even when your freedom has been limited to such an extreme extent. I personally get a feeling of well being after teaching myself a new skill, as our brains reward us chemically for keeping them active and nimble by learning new skills.

One of the skills that has now been dug up is the art of brewing alcohol, which has become a necessity. Unlike sourdough, we can’t simply go buy our favourite beverages from the shops as the sale of alcohol is prohibited in South Africa during lockdown. After 48 days of lockdown it is safe to assume that most people’s beautiful wine collections have been depleted. So what now? I know many South Africans brewed pineapple beer as naughty kids with ordinary household equipment like 5l bottles and bread yeast; the quality of the results varied considerably. Sometimes you ended up with something that was a lot stronger than you had intended (or maybe exactly as potent as you had hoped), or something that smelt and taste like farts. It was not a science and the results were a mixed bag. This seems to be the situation now too.
In this post I am going to share my recipe for making fruit beer, using amongst other thing, pineapple. If you are an old hand at fermenting skip to the recipe, as I am going to explain the basics of fermenting next.
So, what are the factors that impact the end product? For any alcoholic ferment to work you need yeast, preferably a yeast that has been bred for the specific thing you want to brew: champagne, cider, beer, wine, ale yeasts for example, however, even bread yeast will produce alcohol under the right conditions. Yeast lives off sugar and metabolises the sugars to fuel their growth and reproduction. The by-product of this metabolism is alcohol and gasses like carbon dioxide (CO2). That is why bread yeast allows your breads to rise (from the CO2), but the fermenting time is not long enough for there to be any considerable build-up of alcohol. But no one can survive of sugar alone, there are other micro-nutrients yeast enjoy that are found in carbohydrate laden foods such as malt, or fruit. Most yeasts do well with the addition of some tannins and something with a bitter twang (like hobs in normal beer). Beer yeasts grow at room temperature under an-aerobic conditions (no oxygen). Beer yeasts can easily be outcompeted by other micro-organisms that also want to live off the sugars and other nutrients. It is important to do your best to exclude all other micro-organisms and give the yeast you have chosen the best chance to thrive. So, there you go! To make alcohol then you need to keep your yeast happy to keep pooping out alcohol and CO2. You have to have a container that can let out the build up of CO2, yet not allow oxygen to enter, at room temperature, with enough sugar and other nutrients to keep them poopin.
In my household we have beer making equipment, as we have made conventional beer at home before. We got all our equipment at Beer Lab and they are open and delivering currently! The equipment to make beer is elegant in its simplicity. 25l jugs with taps at the bottom and lids that have a stopper to allow CO2 to escape and keeps oxygen out. That’s it.

So you can make beer with anything that contains carbohydrates, vodka is made from potatoes, beer from malt, wine from grapes etc. Any fruit that is high in sugar is a good idea, for my beer I used apples, grapes, pineapple, strawberries, raspberries and pomegranate. For additional umf I added 1kg of sugar.


I also brewed 2l of very strong tea using three types of fragrant Pelargoniums I grow in my garden: lemon, rose and mint. You can use any tea you like for this (rooibos would work really well).

Add a few litres of water, yeast and you are good to go.
Below is my recipe I used with a 25l fermenting tub and all the other beer equipment we have. If you do not have any of this equipment you can use empty 5l water bottles. To create the anaerobic conditions in the bottle while releasing the build up of CO2 you can use a balloon which you stretch over the opening of the bottle. As the balloon fills, you can release the build up of CO2 by carefully lifting the edge of the tapered end of the balloon , without letting oxygen get inside the bottle. Alternatively you can simply cap the bottle with it’s cap and “burp” it every day by gently unscrewing the cab slightly until the seal is broken and you can hear air escaping, again be careful not to let air get inside, this can disrupt the yeast and stop it fermenting in it’s tracks. I used left over cider yeast we had from a previous brewing experiment, brewers’ yeast will give you a superior flavour in your end product, but normal bread yeast will also cause an alcohol fermentation.
Recipe:
2 pineapples: rinds cut off (reserve) fruit blended with 2l of water
1 bag apples (cored and blitzed in blender with 2l water)
1 punnet strawberries, grapes, raspberries (blitzed with 1l water)
The juice of two pomegranates
2l very strong Pelargonium tea
1kg sugar
1 packet of Cider yeast
Loads of water (around 10l water)
For bottling, another approximately100g of dextrose sugar (you can use normal granulated sugar): approximately one table spoon of sugar per 440ml beer for bottling.
Method and equipment:
One of the most important steps in beer making is sterilization of your equipment. If you skip this step you could h


ave bad microbes outcompeting your yeast and your beer could end up making you extremely ill. I used a no-rinse sterilizer that saves water, but you can wash all your equipment that will be touching the ferment with jik water, or if you are opposed to jik you can use boiling water to sterilize your equipment.
First off, brew tea and dissolve 1kg of sugar in the hot water and allow to cool
The recipe requires either juicing fruit, or creating a mash so the sugars in the fruit are available to the yeast. I blended my fruit in a smoothie type blender, it took 10 minutes in total. You can use a cheese grater if you don’t have a juicer or a blender.. Simply add your fruit mash to the vessel you have chosen. Add tea to this mixture. Fill container with water, it took about 10l of water extra in my container. The more water you add, the weaker the beer will be. I wanted a light beer, so this is what I did. When everything is very well and truly combined you can add the yeast on top. Stir with spoon to make sure the yeast gets past the ‘fruity, floaty” crust and into the liquid.

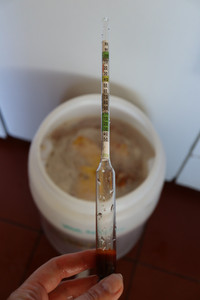


This is the time to take an alcohol reading if you have a hydrometer: the end alcohol volume is relative to the starting density of the liquid.
Put on the stopper/lid/balloon as soon as possible. The mixture should start producing CO2 within a few hours (ours took 8 hours as it was a chilly day). See our stopper bubbling away after 8 hours below.
When the mixture starts making CO2 you know it is fermenting. It is important that you smell the gas coming from your ferment (I know it sounds gross, but it is important to smell the farts of your baby to know it is healthy). If the yeast is doing well you will smell a fruity, fermenting smell, which should be pleasant. If you smell farts, or any other unpleasant odour it means another micro-organism, that is not your intended yeast, has hijacked the sugar in your ferment and you can throw out the batch. Again, you can get very sick from drinking “off” beer. No one is that desperate for a drink hopefully. This does happen, but if you are very good about keeping everything as clean as possible while making the beer it is unlikely.
Take note of the volume of CO2 that is emitted. It should be bubbling more and more vigorously with every passing day. It will start slowing down after about 2 weeks. If it has slowed down completely it is time to bottle: the sugar resources have been exhausted by the yeast.
During fermentation you will notice bits of fruity layers separating, drifting down or up and sediment forming at the bottom of the container. This is normal. When bottling I had to sift the liquid through a cheese cloth to catch all the fruity bits that were hanging around the bottom of the container.


When bottling you need to add additional sugar to the ferment, this will fuel the second ferment in the bottle and give you your fizzy brew. As the yeast grows once more, the CO2 that is produced has nowhere for to go and this is how you get a fizzy drink! You can either add sugar to each bottle individually or you can dissolve the sugar in the ferment. I opted to add the sugar to the bottles as I did not want to disturb the sediment that had formed on the bottom of the container and make the beer murky. Add too much sugar and the beer will shoot out of the bottle when you open it, but on the other hand, no-one likes a flat beer. This is a delicate balance that only comes with experience so don’t be too hard on yourself, and always open bottles outside.
When bottled let it ferment for a further 2 weeks and then you can enjoy it. I used mostly plastic 2l bottles to bottle. This turns out is a great way to bottle this brew, as you can easily feel when the bottle is carbonated sufficiently: it is firm when you press it due to the pressure inside. If using glass bottles, be careful not to use too much sugar for the second ferment as you can have exploding bottles on your hands!
My beer turned out to be a super floral, fragrant, and of course fruity beer that had a active (some would say overactive) second ferment so it turned out suppppper fizzy, which I love. It definitely has an alcoholic taste. My beer only measured about 3% alcohol which is a little lower than I had hoped. My beer would have been a tad stronger if I had left it to ferment for a week longer. We were a little impatient, as our drinks cabinet was running low.
Beer in general is a learning process. Every ferment is different, and every time you learn something. We started another brew immediately. This time we decided to juice the fruit rather than include the chunks, and used way more fruit. It will be a completely different brew, which we intend to ferment for far longer and leave to develop in the bottles for at least 2 months.

I think I will be making a fruit beer monthly, even after the time of Covid. Apart from the amazing, novel flavours you can introduce to your beer, it is just such a cost-effective form of alcohol (important considering we will all have to tighten our belts in the coming months). Additionally, it is nice to have something with a lower alcohol content. I hope you will enjoy using this recipe and the beer that will flow from it. Fermenting anything (especially alcohol during this time) is a celebration of freedom and self-sufficiency, with a sprinkling of frugality (fruit-gality? Should I give up the pun game?).


Comments